Downgrading the PHP version on an Ubuntu server involves several steps. Below is a detailed guide on how to achieve this:
Step 1: Check the Current PHP Version
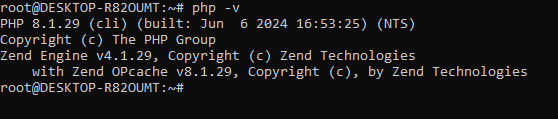
Run the following command to check the current PHP version installed:
php -v
Step 2: List Available PHP Versions
Before downgrading, you should check which PHP versions are available. Add the repository that contains multiple PHP versions:
sudo add-apt-repository ppa:ondrej/php
sudo apt update
Now, list the available PHP versions:
apt-cache showpkg phpStep 3: Install the Desired PHP Version
Install the desired PHP version (for example, PHP 8.1), you can run:
sudo apt install php8.1If you need specific PHP extensions, install them as well. For example:
sudo apt install php8.1-mysql php8.1-xml php8.1-gd php8.1-mbstringStep 4: Disable the Current PHP Version
If you have a newer PHP version enabled, disable it. For example, if you have PHP 8.2
sudo a2dismod php8.2Step 5: Enable the Desired PHP Version
Enable the PHP version you just installed. For example, to enable PHP 8.1:
sudo a2enmod php8.1Step 6: Update Alternatives
Set the newly installed PHP version as the default
sudo update-alternatives --set php /usr/bin/php8.1
sudo update-alternatives --set phar /usr/bin/phar8.1
sudo update-alternatives --set phar.phar /usr/bin/phar.phar8.1
Step 7: Restart Apache/Nginx
Restart your web server to apply the changes:
For Apache:
sudo /opt/lampp/lampp restartStep 8: Verify the PHP Version
Finally, verify that the correct PHP version is now in use:
By following these steps, you should be able to downgrade the PHP version on your Ubuntu server successfully. If you encounter any issues, ensure all dependencies and configurations are properly adjusted to match the PHP version you are downgrading to.

I’m Abhishek, a DevOps, SRE, DevSecOps, and Cloud expert with a passion for sharing knowledge and real-world experiences. I’ve had the opportunity to work with Cotocus and continue to contribute to multiple platforms where I share insights across different domains:
-
DevOps School – Tech blogs and tutorials
-
Holiday Landmark – Travel stories and guides
-
Stocks Mantra – Stock market strategies and tips
-
My Medic Plus – Health and fitness guidance
-
TrueReviewNow – Honest product reviews
-
Wizbrand – SEO and digital tools for businesses
I’m also exploring the fascinating world of Quantum Computing.
Best Cardiac Hospitals Near You
Discover top heart hospitals, cardiology centers & cardiac care services by city.
Advanced Heart Care • Trusted Hospitals • Expert Teams
View Best Hospitals
your directions works perfectly. Thank you